本文最后更新于:2026年7月4日 下午
注:本文用到的所有代码已开源:https://arsrna.coding.net/public/website-mainsite/ArSrNaDDNS/git/
安装请参考上页面的README.md
前言
背景
家里或者公司分配了一个公网IP,但它每过1周就变了,如果我要用它远程桌面,意味着一周就要改一次IP,记一个新的IP,非常复杂,该如何用一个固定的地址来替代这些变化的IP并且实现定时自动替换呢?
亦或者我有一台腾讯云按量付费的CVM,如果我选择关机不计费时,再次开机IP就变了。虽然可以通过购买EIP来固定这个地址,但是成本稍微高了。替代的办法就是动态解析,用一个别名代替变换的IP
而如上,别名就是域名,用一个固定的域名,解析到这些IP,即可实现DDNS
原理
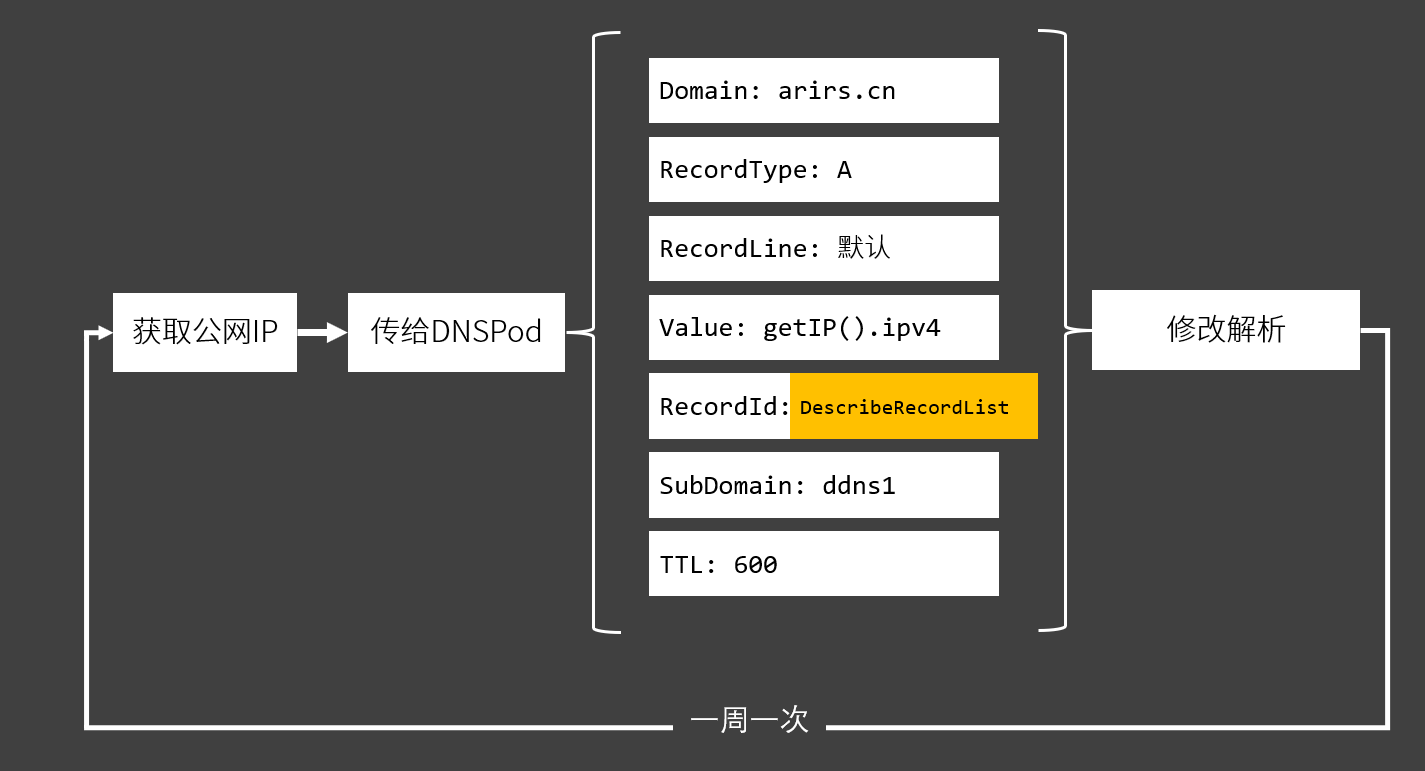
基本流程就是获取公网IP,然后修改某个域名的解析为获得的IP
流程图如下

教程
准备
环境
需要下载Nodejs:Node.js 中文网 (nodejs.cn)
在命令行运行
以及
如果都能正常输出即可
新建项目
新建一个文件夹,名字任意
然后新建一个js,名称任意,但最好纯英文,例如 index.js
获取公网IP
在这里,我们使用npm模块:nodejs-publicip
首先在项目目录执行
1
| npm i --save nodejs-publicip
|
在index.js中加入:
1
| const PublicIp = require('nodejs-publicip');
|
根据这个npm包的说明,知道获取公网的方法为:
1
2
3
4
5
6
7
8
9
| new PublicIp()
.queryPublicIPAddresses()
.then((result) => {
console.log(JSON.stringify(result));
})
.catch((err) => {
console.log(err);
});
|
如果获取成功了,将会输出:
1
| {"ipv4":"124.000.000.000","ipv6":"0000:0000:0000:0000:0000"}
|
DNSPodSDK
流程
根据官网API文档,可以知道,设置解析必须要这几个参数
| 参数名称 |
必选 |
类型 |
描述 |
| Domain |
是 |
String |
域名,这里举例:arirs.cn |
| RecordType |
是 |
String |
记录类型,A为IPv4,AAAA为IPv6 |
| RecordLine |
是 |
String |
记录线路,使用“默认” |
| Value |
是 |
String |
记录值,这里是公网IP值,为上面的函数返回值 getIP().ipv4 |
| RecordId |
是 |
Integer |
记录 ID,需要通过DescribeRecordList获取 |
| SubDomain |
否 |
String |
主机记录,子域名,比如ddns1,就是ddns1.arirs.cn |
| TTL |
否 |
Integer |
TTL,免费版默认600s |
在上表中,可以直接得到的信息除了RecordId,其它都可以直接从控制台得到
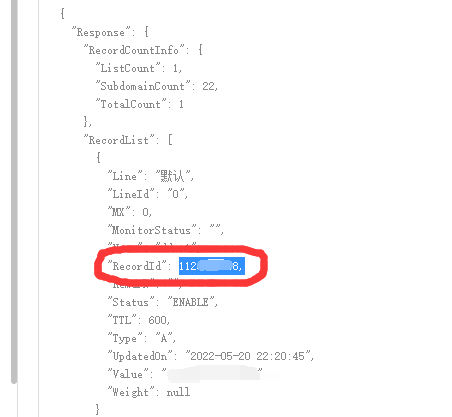
RecordId需要另一个API获得:DescribeRecordList
这个API只需要传入:Domain,Subdomain 即可获得
那么,我们的流程将会是如此
获取RecordId
首先需要在域名解析控制台处新建一个域名解析记录,可参考
DNS 解析 DNSPod 快速添加域名解析-快速入门-文档中心-腾讯云-腾讯云 (tencent.com)
添加的记录先用一个 0.0.0.0占用,比如

在API Explorer DNSPod修改解析方法下 API Explorer - 云 API - 控制台 (tencent.com)
填写以下参数
| 参数 |
说明 |
| Domain |
域名,比如 arirs.cn |
| Subdomain |
子域名解析记录,上图表示的是 ddns1 |
|
|
|
|
|
|
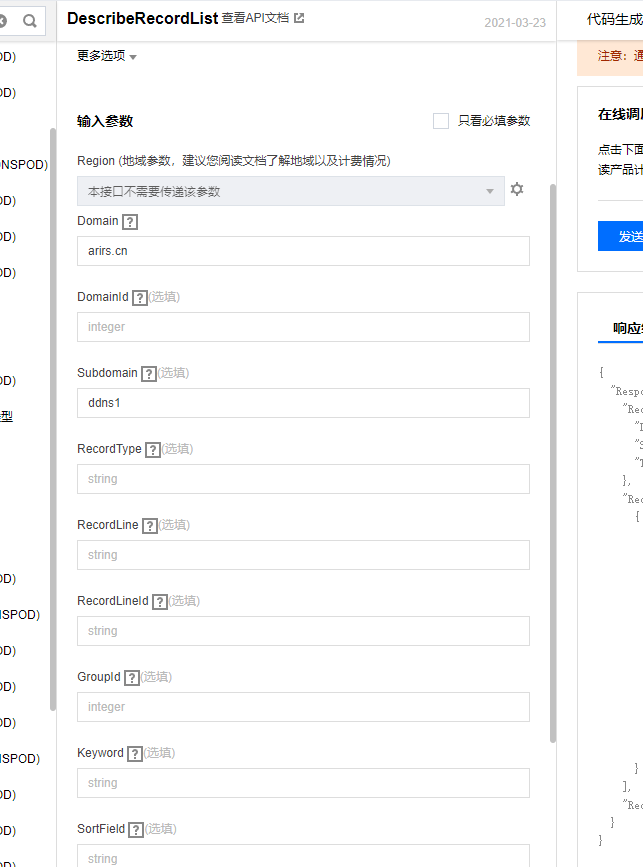
完成后在 在线调用 处点击 发送请求
即可获得RecordId
使用SDK修改解析
在项目目录里面打开终端,键入
1
| npm i --save tencentcloud-sdk-nodejs-dnspod
|
安装腾讯云的Nodejs SDK
在API Explorer的 修改记录(DNSPOD) 点此进入 里面,按照上文的参数,输入进去
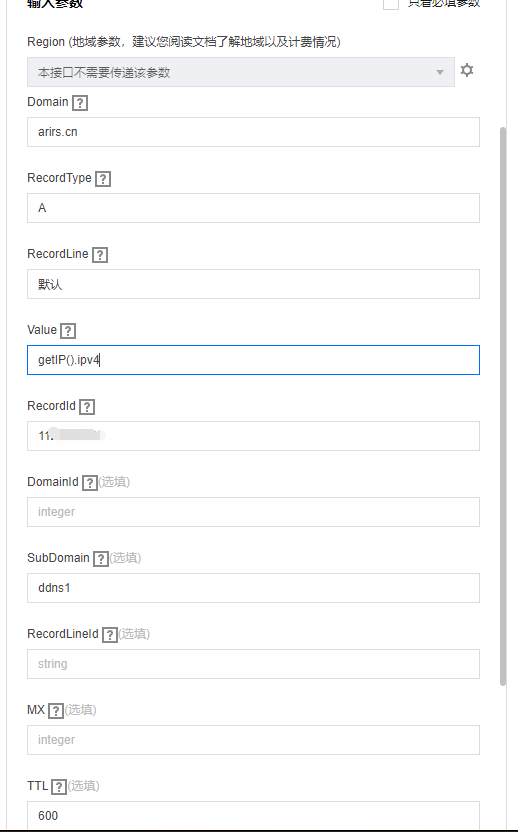
切换到代码生成这一栏,选择Nodejs
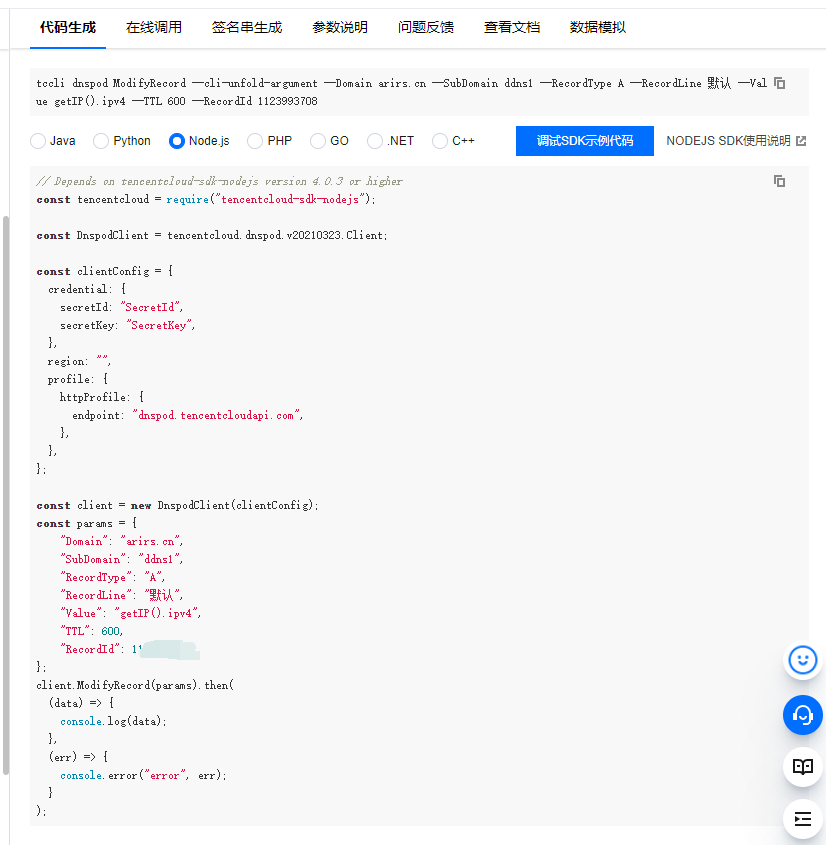
把代码复制下来,除了第一行原来的引用要换为
1
| const tencentcloud =require("tencentcloud-sdk-nodejs-dnspod");
|
那么代码就是
1
2
3
4
5
6
7
8
9
10
11
12
13
14
15
16
17
18
19
20
21
22
23
24
25
26
27
28
29
30
31
| const clientConfig = {
credential: {
secretId: "SecretId",
secretKey: "SecretKey",
},
region: "",
profile: {
httpProfile: {
endpoint: "dnspod.tencentcloudapi.com",
},
},
};
const client = new DnspodClient(clientConfig);
const params = {
"Domain": "你的域名",
"SubDomain": "你的子域名",
"RecordType": "A",
"RecordLine": "默认",
"Value": ip,
"TTL": 600,
"RecordId": 你所获取到的ID
};
client.ModifyRecord(params).then(
(data) => {
console.log(data);
},
(err) => {
console.error("error", err);
}
);
|
根据文档,把代码修改成自己的参数
然后封包为方法,方便调用
1
2
3
4
5
6
7
8
9
10
11
12
13
14
15
16
17
18
19
20
21
22
23
24
25
26
27
28
29
30
31
32
33
| function changeIP(ip){
const clientConfig = {
  credential: {
    secretId: "SecretId",
    secretKey: "SecretKey",
  },
  region: "",
  profile: {
    httpProfile: {
      endpoint: "dnspod.tencentcloudapi.com",
    },
  },
};

const client = new DnspodClient(clientConfig);
const params = {
    "Domain": "你的域名",
    "SubDomain": "你的子域名",
    "RecordType": "A",
    "RecordLine": "默认",
    "Value": ip,
    "TTL": 600,
    "RecordId": 你所获取到的ID
};
client.ModifyRecord(params).then(
  (data) => {
    console.log(data);
  },
  (err) => {
    console.error("error", err);
  }
);
}
|
在上面获取IP那部分将回调设置为调用这个函数即可
1
2
3
4
5
6
7
8
| new PublicIp()
.queryPublicIPAddresses()
.then((result) => {
changeIP(result.ipv4)
})
.catch((err) => {
console.log(err);
});
|
到这里,就算完成这一流程了
可以运行一下看下结果
出现类似这样的就是成功了

总代码
1
2
3
4
5
6
7
8
9
10
11
12
13
14
15
16
17
18
19
20
21
22
23
24
25
26
27
28
29
30
31
32
33
34
35
36
37
38
39
40
41
42
43
44
45
46
47
48
| const PublicIp = require('nodejs-publicip');
const tencentcloud = require("tencentcloud-sdk-nodejs-dnspod");
const DnspodClient = tencentcloud.dnspod.v20210323.Client;
new PublicIp()
.queryPublicIPAddresses()
.then((result) => {
changeIP(result.ipv4);
})
.catch((err) => {
console.log(err);
});
function changeIP(ip){
const clientConfig = {
credential: {
secretId: "替换为你的secretId",
secretKey: "替换为你的secretKey",
},
region: "",
profile: {
httpProfile: {
endpoint: "dnspod.tencentcloudapi.com",
},
},
};
const client = new DnspodClient(clientConfig);
const params = {
"Domain": "你的域名",
"SubDomain": "子域名",
"RecordType": "A(IPV6为AAAA)",
"RecordLine": "默认",
"Value": ip,
"TTL": 600,
"RecordId": 替换成你的Recordid
};
client.ModifyRecord(params).then(
(data) => {
console.log(data);
},
(err) => {
console.error("error", err);
}
);
}
|
代码可以前往
自动化
现在已经可以通过命令行
来运行这个程序了
那么就把他打包为cmd
Windows中每周执行一次
可参考文章:windows设置定时任务执行程序命令_13271972的技术博客_51CTO博客
Nodejs原生循环执行
如果你的业务场景很复杂,需要几分钟就变一次解析(而且你的套餐TTL很短)的情况下,建议直接使用setInterval定时器来进行操作
只需要在PublicIP这个方法前后包裹一个SetInterval
1
2
3
4
5
6
7
8
9
10
| setInterval(function(e){
new PublicIp()
.queryPublicIPAddresses()
.then((result) => {
changeIP(result.ipv4);
})
.catch((err) => {
console.log(err);
});
},600000)
|
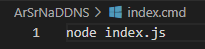
再次运行 node index.js 即可
到此,教程就结束了,更多可能,需要我们一起探索
Powered by Ar-Sr-Na